

I am a photography & graphic art dummy, and of course my cheap@$$ wanted to DIY this within my usual budget of zero dollars. The following is my ghetto instructions on creating the digi-silhouettes:
1. Set up the 'studio' by a bright window on a sunny day:
- Tape a big piece of white tissue paper to cover the window (this becomes the backdrop)
- Minimize the rest of the light coming in the room (see how I closed the curtains except for the opening I needed)
- Set a chair in front of the window and adjust seat height (I used pillows) so subject's profile fits within the framed area
 2. Get your camera ready:
- Fancy camera not necessary, I just used my 5 years old point and shoot here
- A tripod is helpful, but also not necessary if someone can take the picture
- Turn OFF the flash
- Zoom in to fit only what you need

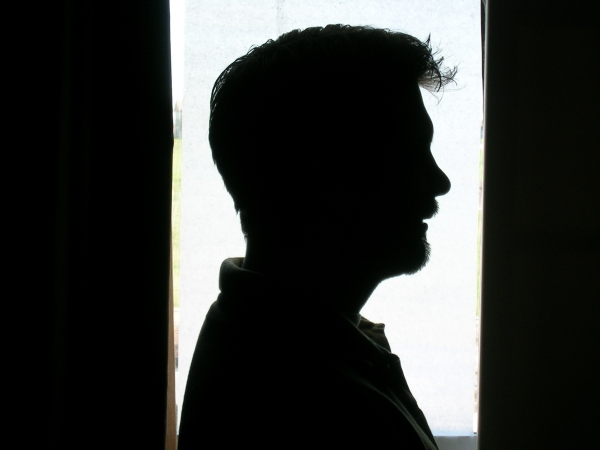
3. Sit your subject down and snap away (here's the original pic of da hubs):

4. Then we edit - I chose Picnik to show you since it's available freely to everyone, but most photo editing software can do these steps. First, crop and resize the photo as desired under the 'Edit' tab (make sure you crop out all areas not covered by the tissue paper):

5. Convert the image using the black and white effect under the 'Create' tab:

6. Return to the 'Edit' tab and adjust the exposure. Turn down the exposure and up the contrast until you get a clearly defined silhouette and the background becomes white with indistinguishable edges:
 7. Save the photo and you've got your very own digi-silhouette!

Additional tips:
- SMILE! We looked like the fighting GTs living on Grumpy Ln. on the first trial
- Minimize flyaways by wetting/gelling your hair
- The window should provide bright light that can be diffused by the tissue paper (you don't want the sun to be IN the picture and create a concentrated glow)
- Minimize light shining on the side of the subject that faces the camera
- You can further touch up the bright spots (like the back of his collar) in simple programs like Paint, simply paint grey spots black
- To make address label, I just plopped the images into PowerPoint, then added text and autoshapes to use as frames

LOL at Nerdville. You crack me up! I love these, super creative and fun! Thanks for teaching us how to do them as well! I'll be linking.
ReplyDeleteNiiiiiiiice! Saw you on One Pretty Thing -- this is just the ticket for a Mom that blew the whole silhouette craft cutting thing when the kids were really little. This is so much better than trying to get them to hold still while drawing their little pin heads! LOL!
ReplyDeleteGreat idea!
ReplyDeleteThese turned out so great! Awesome job!
ReplyDeleteLove it! I am the same way--super cheap! My budget is always $0 too! I will have to try this out. Thanks!
ReplyDeleteI hope we have sunshine today--I have to try this!
ReplyDeleteHow did I miss this post? I love the labels!!!
ReplyDeleteI have been looking for a cheap great way to get silhouettes! Thank you so much for posting this! It's a great idea for wedding invitations and a cool kindergarten project!
ReplyDelete